Micromesh polishing cloths are traditionally used for polishing delicate or valuable items such as jewellery and...

Cart 0 Product Products (empty)
No products
Free shipping! Shipping
£ 0.00 Total
Product successfully added to your shopping cart
Quantity
Total
There are 0 items in your cart. There is 1 item in your cart.
Total products (tax incl.)
Total shipping (tax excl.) Free shipping!
Total (tax incl.)
Search Tips
Tips categories
Latest Tips
-
 What is a micromesh polishing cloth?Read more
 -
 How do I paint panel lines on my model aircraft?Read more
There are various techniques for adding these fine lines to your model. I always give my model a coat of gloss...
-
 How wide are roads?Read more
If you are modelling a road, you need to know how wide the real thing is so your model can be accurate. Road widths...
-
 What is a Commonwealth bogie?Read more
Bogies are a chassis (or framework) that carry a wheelset on a railway locomotive or rollingstock. The Commonwealth...
-
 What colour primer was used in WWII armour?Read more
Rust prevention is pretty much at the top of the list when it comes down to criteria for military primers. Because of...

How do I put together a white metal kit?
The concept of putting together a white metal kit is very much the same as with plastic ones: you have sections or parts that need removing from sprues, followed by a spot of sanding before sticking them all together and painting. So if you fancy giving one a go, then you should because it really is that simple, kind of!
Although the concept is the same, the materials and tools used to construct a white metal kit will differ slightly from the usual craft knife and PVA glue. Most white metal kit builders will use a combination of solder and epoxy resin to join kits together and tools such as a metal file and a good pair of side cutters to remove and sand the parts (although some smaller parts will be happily plucked from the sprues by hand but this is rarely a good idea).
A good place to start when constructing a white metal kit is to have a helping-hand device or clamp available to hold the parts in place while you solder them together. Parts should be joined initially with spots of solder (a bit like a spot weld) preferably in a place that will not be visible when viewing the model, the join can be strengthened by adding a seem of solder later once the initial join is complete.
For parts that are to be joined where there's no opportunity to hide the solder spots, a fast-drying epoxy resin is the best way forward to save you from endless sanding to smooth out the solder.
The great thing about using solder to secure the joins is that if the parts don't join neatly or to your satisfaction, you can melt them apart and try again, not so easy with plastic and glue!
Posted in: Kit building
Click here to receive the tips weekly in your mailbox. You can unsubscribe at any time.
Related products
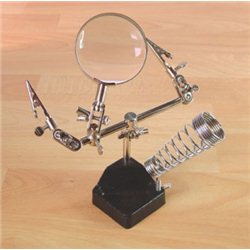
Helping Hands with Glass Magnifier and...
Price: £ 6.95Helping Hands with Glass Magnifier and soldering iron holder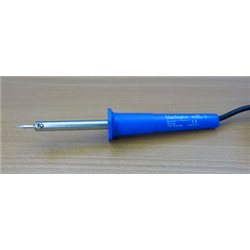
Economy 30 watt Soldering Iron with fine...
Price: £ 7.95Economy 30 watt Soldering Iron with fine pointed tip
Related posts
-
 Do I need to wash my plastic kit?I personally wash all my plastic kits, I use warm soapy water (Washing up liquid) and a light rub over with a nail...
 - What is Milliput?Milliput is a two-part epoxy putty. There are two different colour rolls in a box when these are mixed together it...
- What modelling tools do I need to get started?Most modellers have an extensive tool kit, a tool for every eventuality. But when first starting a scalpel or a...
- How do I remove parts from the sprue?The short answer is carefully. The best way is with a sprue and plastic cutter but always be mindful of exactly...
- Do I need a cutting mat?It is not essential to have a cutting mat, but it is a good idea. It saves getting in trouble with your significant...