There are many variations of wheel arrangements for diesel and electric locomotives just as there were with steam...

Cart 0 Product Products (empty)
No products
Free shipping! Shipping
£ 0.00 Total
Product successfully added to your shopping cart
Quantity
Total
There are 0 items in your cart. There is 1 item in your cart.
Total products (tax incl.)
Total shipping (tax excl.) Free shipping!
Total (tax incl.)
Search Tips
Tips categories
Latest Tips
-
 What is a Co-Co wheel arrangement?Read more
 -
 What is a private owner wagon?Read more
In the world of model railways, a private owner wagon refers to a freight wagon that, in real life, was owned by a...
-
 How do I best use Micro Sol and Micro Set?Read more
Micro Set and Micro Sol decal setting solutions work well in combination in applying decals to uneven surfaces and...
-
 Are resin kits better than plastic kits?Read more
Resin scale kits are made from a type of plastic that is known for its high level of detail and accuracy. The...
-
 What advantages do servo motors have over solenoids for operating points and semaphore signals on a model railway layout?Read more
Servo motors offer several advantages over solenoids when it comes to operating points and semaphore signals on a...

How can I stop light shining through wall joints or the base of a building?
There are several ways to overcome the problem of lights shining through narrow gaps around the base of a model building.
In this case, it is good practice to test buildings for light leakage before securing them in place. One option for the prevention of leakage may be to line the inside of the model with paper, especially around corners or the joins of walls or outbuildings. Another option is to use a light-blocking material such as black electrical tape or foam board to cover the gaps. This will help to block the light from shining through and reduce the visibility of the gaps.
Another option may be to use a baseboard with a higher edge that extends up around the sides of the model building. This can help to block the light from shining through the gaps and also create a more cohesive and realistic appearance for the model. Another trick may be to use the topography of the layout to mask any leakage, such as the planting of trees or shrubs, the careful positioning of an earth bank or compost heap or the close positioning of another outbuilding such as a shed or coal bunker. This may not always hide gaps around the base of the building so the use of a modelling paste such as Vallejo's Earth texture range can be easily used to plug any gaps at ground level and can easily be overpainted to blend it into the layout.
If the light-blocking material is not an option, you can try using a light-diffusing material such as frosted acrylic or white tissue paper to cover the gaps. This will help to scatter the light and reduce the visibility of the gaps. Another option is to try using a different light source that produces less intense or focused light. This can help to reduce the visibility of the gaps and create a more even lighting effect for the model.
Finally, you can try repositioning the light source to a different angle or distance from the model. This can help to reduce the visibility of the gaps and create a more realistic lighting effect for the model.
Posted in: Assembling and gluing
Click here to receive the tips weekly in your mailbox. You can unsubscribe at any time.
Related products

Stone Textures - Dark Earth 200ml
Price: £ 10.75Stone Textures - Dark Earth 200ml Vallejo Dark Earth is made from sand and...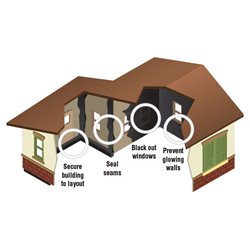
Light Block Kit
Price: £ 17.50Keep light inside a structure, where it belongs! Includes :- Masking paint 2...
Light Diffusing Window Film
Price: £ 17.50Diffuses light evenly throughout when lights are on and eliminates the need...
Related posts
-
 Do I need to wash my plastic kit?I personally wash all my plastic kits, I use warm soapy water (Washing up liquid) and a light rub over with a nail...
 - What is Milliput?Milliput is a two-part epoxy putty. There are two different colour rolls in a box when these are mixed together it...
- What modelling tools do I need to get started?Most modellers have an extensive tool kit, a tool for every eventuality. But when first starting a scalpel or a...
- How do I remove parts from the sprue?The short answer is carefully. The best way is with a sprue and plastic cutter but always be mindful of exactly...
- Do I need a cutting mat?It is not essential to have a cutting mat, but it is a good idea. It saves getting in trouble with your significant...