Flash on a model is the flat bits of extra material that you will often see attached to the various pieces of a model...

Cart 0 Product Products (empty)
No products
Free shipping! Shipping
£ 0.00 Total
Product successfully added to your shopping cart
Quantity
Total
There are 0 items in your cart. There is 1 item in your cart.
Total products (tax incl.)
Total shipping (tax excl.) Free shipping!
Total (tax incl.)
Search Tips
Tips categories
Latest Tips
-
 What is flash on a model?Read more
 -
 Which tools are best used to cut N and OO/HO tracks ?Read more
There are a variety of tools that will allow a modeller to cut track sections cleanly and accurately. Track cutters...
-
?") Is it possible to model Era 1 (Pioneering 1804-1869)?Read more
Is it possible to model Era 1 (Pioneering 1804-1869)?Read moreHaving experienced the incredible talent of many scratch-builders over the years, one would have to concede that...
-
 What is flock as used for scale modelling?Read more
In scale modelling, "flock" refers to finely ground fibres or particles used to simulate textures such as grass,...
-
 How can I protect my track from oxidisation ?Read more
Oxidation, also known as rust, can be a common problem for model railway tracks, especially if they are exposed to...

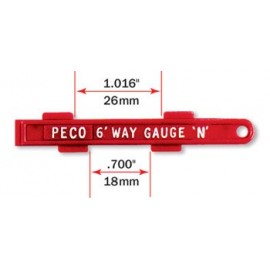
How to use a track gauge like Peco SL-36 and SL-336?
Track gauges of this type don't look like much when you take them out of the box and it's often hard to see how to use them as they don't come with any instructions, but appearances can deceive and this little tool is actually quite brilliant!
A way-gauge is used to allow modellers to lay their tracks a set/uniform distance apart. This is achieved by slotting one of the little plastic tabs that stick out from the side of the way-gauge neatly between the rails of a piece of track. The other tab sticking out further along the shaft of the gauge is to slot between the rails of a parallel track. Once those pieces of track have been secured in place, you can slide the gauge along the track to the next fixing point and repeat the process.
You will notice that there are tabs on both sides of the way-gauge and that they are set at different distances apart. The tabs on the bottom of the gauge that are closer together are for setting Peco Streamline track, using this measurement will give you a distance of 51mm between the track centres (in 00 gauge). That distance when scaled up would equate to a real life distance of just over 3.8m which is the most prototypical closely resembling a 3.5m standard. It should be noted however that the distance between tracks in real life does vary depending on where the track is laid, when the track was laid, radius and the purpose of the track.
The other measurement on the way-gauge (with the tabs spaced further apart) is used for laying Setrack and will give a distance of 67mm between track centres giving a scaled up representation of 5.1m. Although such larger track spacing does occur on occasion in real life, the decision to space Setrack in this way has more to do with the functionality of the model and the space needed for tighter radius curves or point-work than duplicating real life.
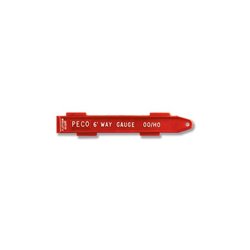
Another feature of the way-gauge is the little indicator on the square end for measuring your platform height. This is used by resting one of the gauge's tabs on top of your rails, with the way-gauge in place your platform top should come to the same height as the top of the way-gauge.
Way-gauges are available for 00 and N gauge tracks. They may not look like much but they certainly produce big effects!
Posted in: Model Railway
Click here to receive the tips weekly in your mailbox. You can unsubscribe at any time.
Related products
Related posts
-
 What scale is Hornby?Hornby model railways are OO Scale or 1/76th that is 4 millimetres to the foot (12 inches). It runs on a track with...
 - How to weight my model so it does not tip?For wargaming figures, a small coin or washer glued to the under side of the base will usually to do the job. This...
- Is Bachmann compatible with Hornby?Yes, any OO scale loco, wagon or coach will work on any OO scale track, regardless of brand. Couplings are also...
- What are the model railway eras?According to Bachmann, as it states in their catalogue there are 9 eras. As they say in their catalogue this is not...
- Can a "DCC ready" train be used on analogue?Yes, you can use a DCC ready train on your analogue layout. DCC ready just means that the train has been factory...