Once the cockpit sub-assembly has been completed and painted there are a number of techniques that can be made to...

Cart 0 Product Products (empty)
No products
Free shipping! Shipping
£ 0.00 Total
Product successfully added to your shopping cart
Quantity
Total
There are 0 items in your cart. There is 1 item in your cart.
Total products (tax incl.)
Total shipping (tax excl.) Free shipping!
Total (tax incl.)
Search Tips
Tips categories
Latest Tips
-
 What painting options do I have for weathering a model aircraft cockpit?Read more
 -
 Can I use WD-40 on my model railway locomotive?Read more
Every toolbox has a can of WD-40 in it to rid the world of squeaks and loosen any stubborn nuts and bolts, so the...
-
 What is a gunpowder van?Read more
As the name suggests, gunpowder vans were used to transport gunpowder and other explosive materials by rail. The...
-
 What are 5 and 7 plank wagons?Read more
5 and 7 plank wagons are a type of railway wagon design dating back to the early 1900s. They are a simple design of...
-
 How big is a flock of sheep?Read more
How big is your farm? If your farm is predominantly dairy cattle, then you may only have 50 sheep however if your...

How do I paint glowing lanterns?
To paint glowing lanterns on miniatures, you'll need to simulate a light effect that gives the impression of a soft, glowing glow. Here's how you can do it:
Base Coat the Lantern: Start by painting the lantern itself. For the metal parts, use a dark metallic colour (like Gunmetal) for the frame and accents. The lantern's glass can be painted a dark colour, such as black or dark brown, to represent the lack of light.
Add the Glow Effect: The key to making the lantern glow is using bright, light colours. You'll typically want to use yellow, orange or even a pale green to simulate the light from the lantern. Here's how you can layer it:
- Use a bright yellow or orange to paint the area where the light source would be (the inside of the lantern).
- Blend it out towards the edges of the lantern's glass and make the glow softer as it moves away from the light source. This is often done by mixing in a bit of white or a very pale yellow into your paint.
Glazing the Light: To create the illusion of light spilling out of the lantern, you'll want to use a glazing technique. Thin down a bright yellow or orange glaze (by mixing the paint with water or a medium like a yellow glaze) and gently apply it over the surrounding areas where the light would affect the surroundings. This could be the base of the lantern or the areas around it. Apply thin layers, building the glow up gradually.
Highlighting the Lantern: Use a very light colour to highlight the edges of the lantern itself. For the metal parts, use a metallic highlight like light silver. For the glass, you can use a faint touch of white or a very pale yellow along the edges to make it look like the light is interacting with the lantern's surface.
Final Touches (Optional): For even more impact, you could use a very fine drybrush of white or light yellow on the topmost surfaces, such as the top of the lantern or any raised parts, to give the appearance that they are reflecting the light. You can also use a very fine brush to add some tiny "light" streaks spilling out of the lantern onto the surrounding base.
This effect works best with darker backgrounds or surfaces around the lantern, as the light contrast will make it pop. You can experiment with layering and blending to refine the effect, and remember that a glowing effect is all about subtlety and gradual transitions in light.
Posted in: Painting
Click here to receive the tips weekly in your mailbox. You can unsubscribe at any time.
Related products

BR Head & Tail Lamps White (10)
Price: £ 11.95BR Head & Tail Lamps White (10)Lamps require removing from sprues and gluing...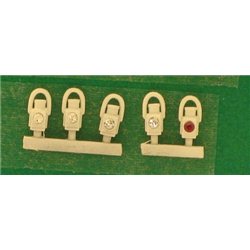
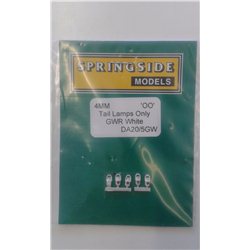
Tail Lamps GWR White (5)
Price: £ 6.95Tail Lamps GWR White (5)Lamps require removing from sprues and gluing in place.
Related posts
-
 Do I need to use a primer?For best results it is advisable to use a primer as this will stick to the plastic and give a uniform coat of paint...
 - What is weathering?Weathering is a painting technique used by modellers to create the appearance of dirt and grime and even damage to...
- How do I clean brushes used with enamel paint?Enamel paint is solvent based, so trying to wash in water will not work, you need to use white spirit. It is...
- How do I fill holes in a model?There are many products on the market for filling holes: There are plastic putties straight out of the tube, there...
- What is the best size paintbrush?This would depend on what you are painting as paint brushes come in various shapes and sizes. I would say for...