The most common wood for baseboards is probably chipboard as this is relatively inexpensive. Plywood is another...

Cart 0 Product Products (empty)
No products
Free shipping! Shipping
£ 0.00 Total
Product successfully added to your shopping cart
Quantity
Total
There are 0 items in your cart. There is 1 item in your cart.
Total products (tax incl.)
Total shipping (tax excl.) Free shipping!
Total (tax incl.)
Search Tips
Tips categories
Latest Tips
-
 What is the best wood for baseboards?Read more
 -
 What is the best paint for plastic kits?Read more
There are many types of paint that can be used on plastic kits, and the best choice will depend on the specific...
-
 How can I stop light shining through wall joints or the base of a building?Read more
There are several ways to overcome the problem of lights shining through narrow gaps around the base of a model...
-
 What are the benefits of using magnetic couplings on my locomotives and rolling stock?Read more
Using magnetic couplings on scale locomotives and rolling stock can offer several benefits, including: Realistic...
-
 What is 1:148 scale?Read more
1:148 scale refers to a model where the real-life prototype that the model is based on is 148 times bigger than the...

How do I create illusions of depth and distance on a layout?
One of the greatest challenges in model railway layout design is creating a convincing sense of depth and distance within the compact dimensions of most layouts. Even the largest home layouts are still models at a reduced scale, so skilled modellers must employ various techniques to trick the eye into perceiving realistic depth and distance. By understanding and utilising the right approaches, you can make your layout appear much larger than it truly is.
Diminishing sizes and details
A fundamental principle is making objects appear smaller and with less detail the further away they are situated. Decreasing the size of trees, buildings, vehicles and other scenery elements as they recede into the "distance" is crucial. Up close scenery pieces should have a higher level of detail, texture and weathering. The further away they are positioned, the less specific detail is needed as the human eye will perceive less texture from a distance.
Atmospheric perspective
Another technique that works hand-in-hand with diminishing sizes is atmospheric perspective. This simulates the effect of the earth's atmosphere making distant objects appear faded, hazy and with less contrast. Use pale washes, dry brushing, or an airbrush to lightly mist distant scenery elements with a bluish or greyish tint. The further away an object, the lighter and lower contrast it should be with less vibrancy. Nearby scenery in the "foreground" should have richer colours and higher contrast.
Elevated horizon and forced perspective
Elevating your horizon line, where the sky meets the layout edge, will enhance depth perception. Having the far backdrop rise up above eye level creates a greater impression of distance. This ties in with forced perspective by positioning taller elements like trees and buildings further away, and shorter pieces closer. Even gently raising the terrain level towards the back can reinforce this illusion.
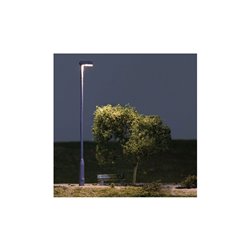
Lighting and shadows
Carefully planned lighting is a powerful tool for creating a sense of depth and distance. Vary the brightness and colour temperature of lights moving from the foreground to the background. Use brighter, warmer lights on closer scenery that casts stronger shadows. Background lighting should be dimmer and cooler in tone with more diffuse, softer shadows. Directional lighting that mimics sunlight also enhances depth through shadow density.
With some thoughtful layout planning, precise modelling, and application of these techniques, even a compact model railway can appear to go on for miles into the distant vista. Pay close attention to depth cues and it will greatly elevate the realism and immersion of your miniature world.
Posted in: Scenery
Click here to receive the tips weekly in your mailbox. You can unsubscribe at any time.
Related products
Related posts
-
 Is static grass better than scatter?I use both, separately and together. Static grass comes in various sizes from 0.5mm to 12mm while scatter is...
 - How do I apply static grass?Static grass is best applied using a static grass applicator. There are several on the market and they can apply...
- What colour are tree trunks?Tree trunks are actually grey in colour and not brown as you would think. The next time you are out and about just...
- How to make hills?You can make hills in a variety of ways. The tried and tested way is with chicken wire and papier mache. This is a...
- How do I glue scatter?Select the area where you want the scatter, then apply a layer of PVA glue, sprinkle your grass covering the glue....